A Data Table is your own spreadsheet-style list of cases: you choose the columns (any client, case, court date, appointment, custom or intake field) and which cases appear. Then you can search it, sort it, group it into separate tables (for example one per attorney), edit cells right in the table and download it as a CSV or PDF.
Time needed: about 6 minutes.
Before you start: anyone can make a personal table. Firm Wide tables are seen by everyone at your firm; their columns and saved views can be changed by the person who made them, the firm’s owner and administrators, and staff with permission to edit firm-wide data tables.
Step 1
Create a table
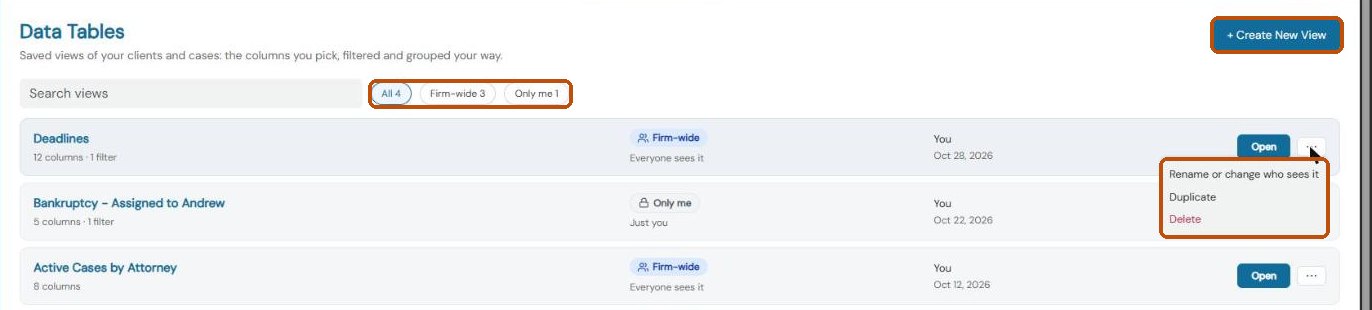
Click Data Tables in the left menu. The page lists your tables, with who sees each one; search them, or click Firm-wide or Only me to narrow the list. Click Open to open a table, or ⋯ to rename it or change who sees it, Duplicate it or Delete it.
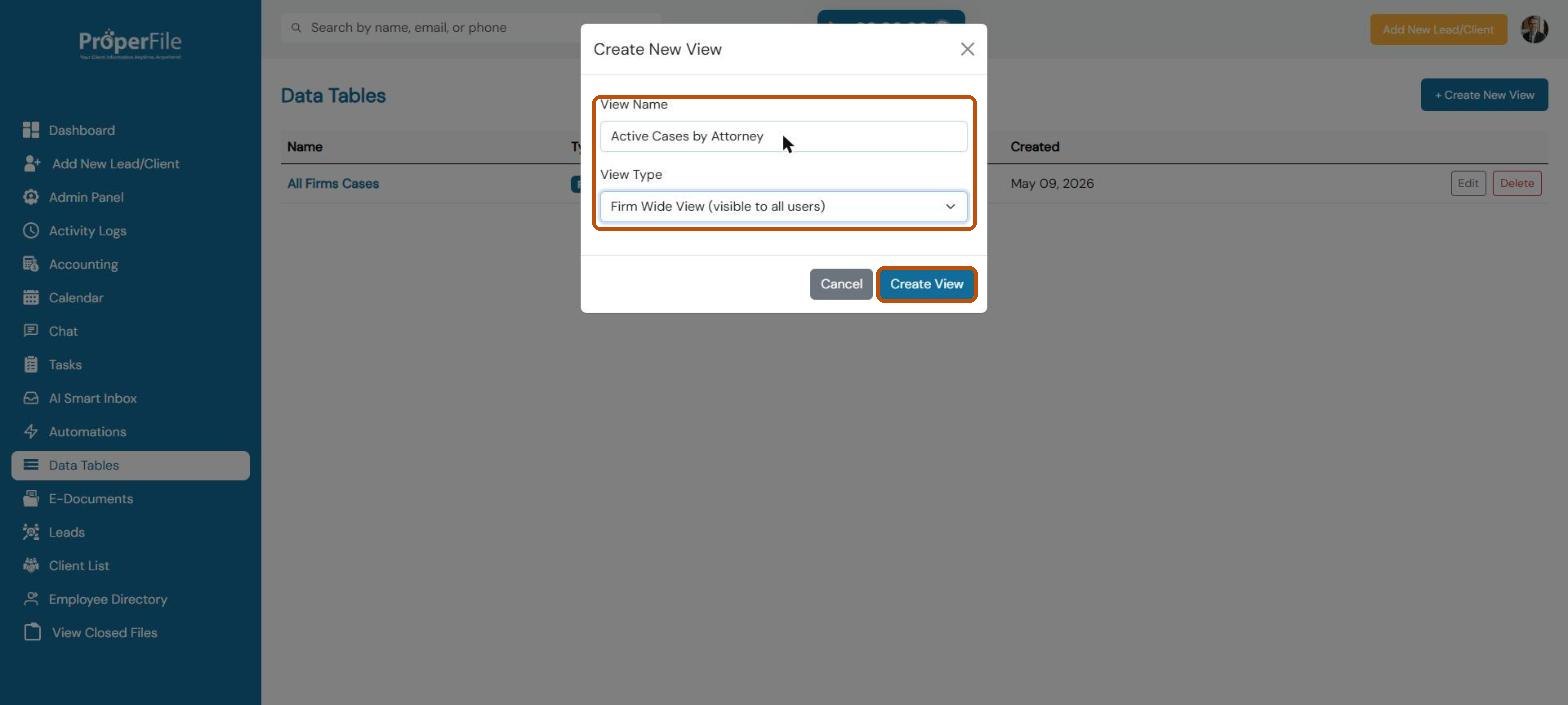
To make a new one, click + Create New View. Give the table a name and choose Personal View (only you see it) or Firm Wide View (everyone at your firm sees it). Click Create View.
Step 2
Choose the columns
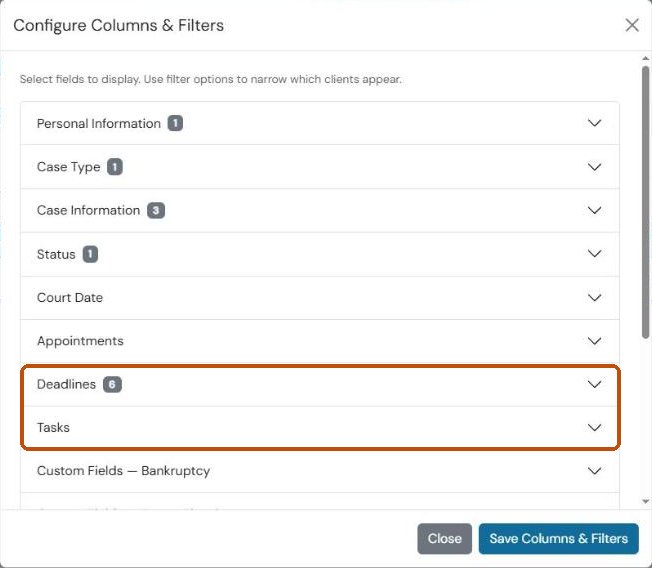
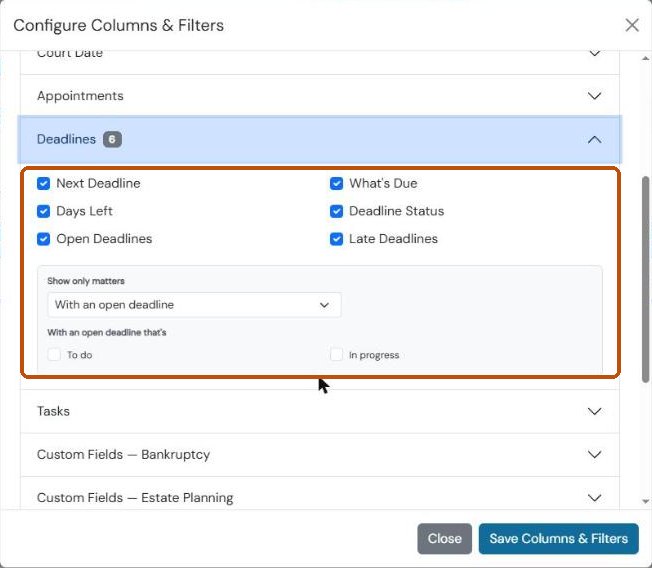
Click + Columns. Open a section (Personal Information, Case Type, Case Information, Status, Court Date, Appointments, Deadlines, Tasks, and your custom and intake fields) and tick the fields you want as columns. The number next to a section shows how many you’ve ticked. Click Save Columns & Filters.
Each matter gets its own row, so a client with two matters (for example a bankruptcy and a personal injury case) appears twice.
Step 3
Narrow down which cases appear
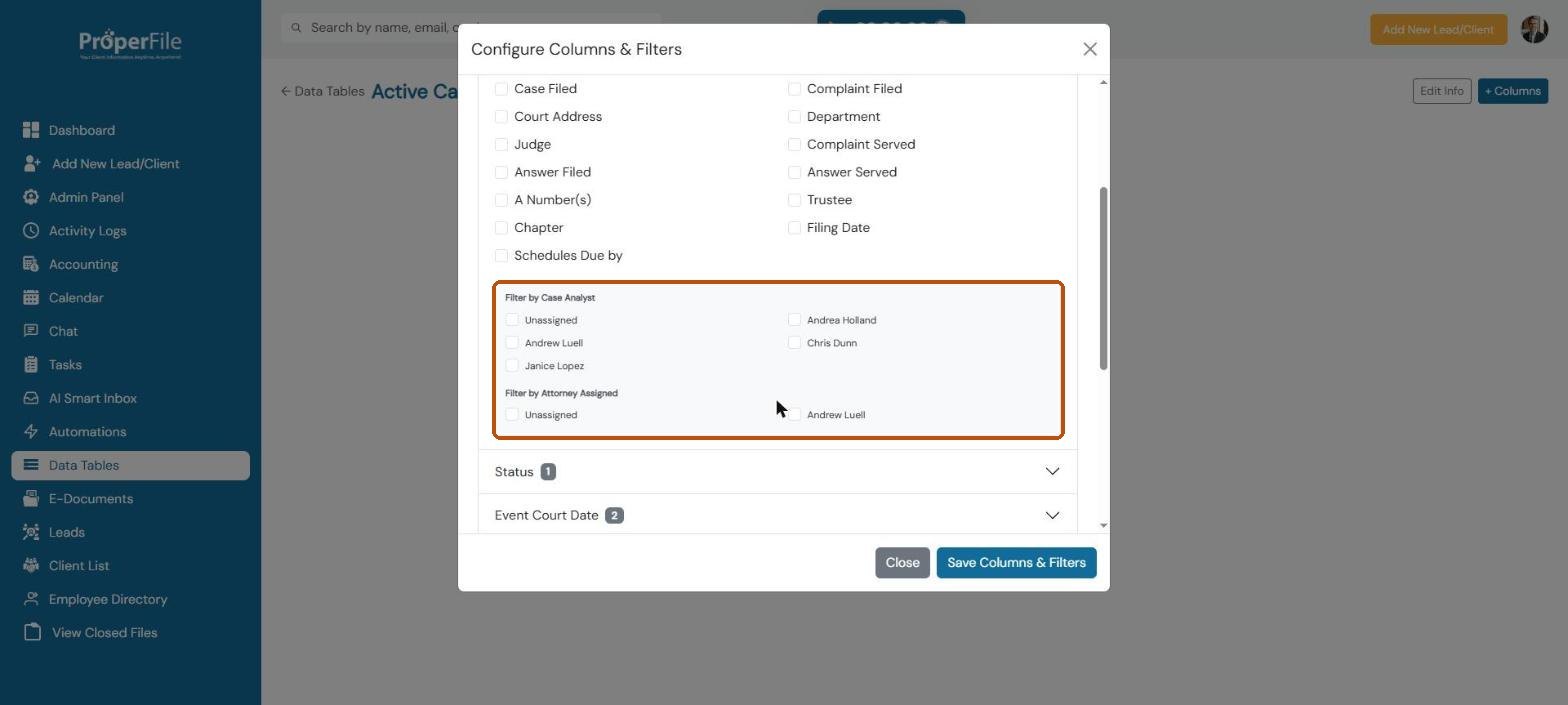
Under the fields of a section you’ll find its filters: for example only Bankruptcy cases, only some statuses, or only the cases of one attorney or case analyst. Leave them all unticked to see every case.
Step 4
Keep an eye on deadlines and tasks
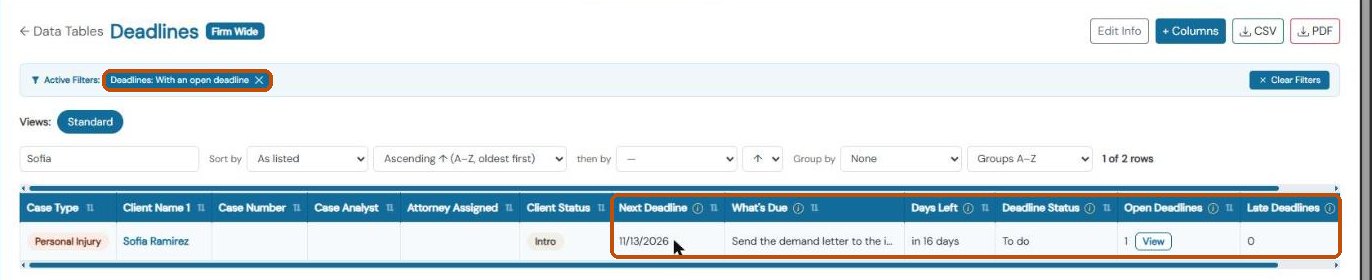
Under Deadlines, tick columns such as Next Deadline, What’s Due, Days Left, Deadline Status, and the number of Open Deadlines and Late Deadlines. Under Show only matters, choose for example With an open deadline, With a late deadline or Deadline in the next 7 days (or late).
Under Tasks, tick Next Task Due, Next Task, Task Assigned To, Open Tasks or Overdue Tasks.
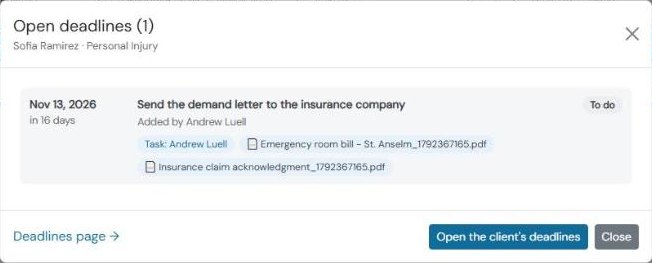
In the table, click View next to the number of open deadlines to see them, with their tasks and linked documents.
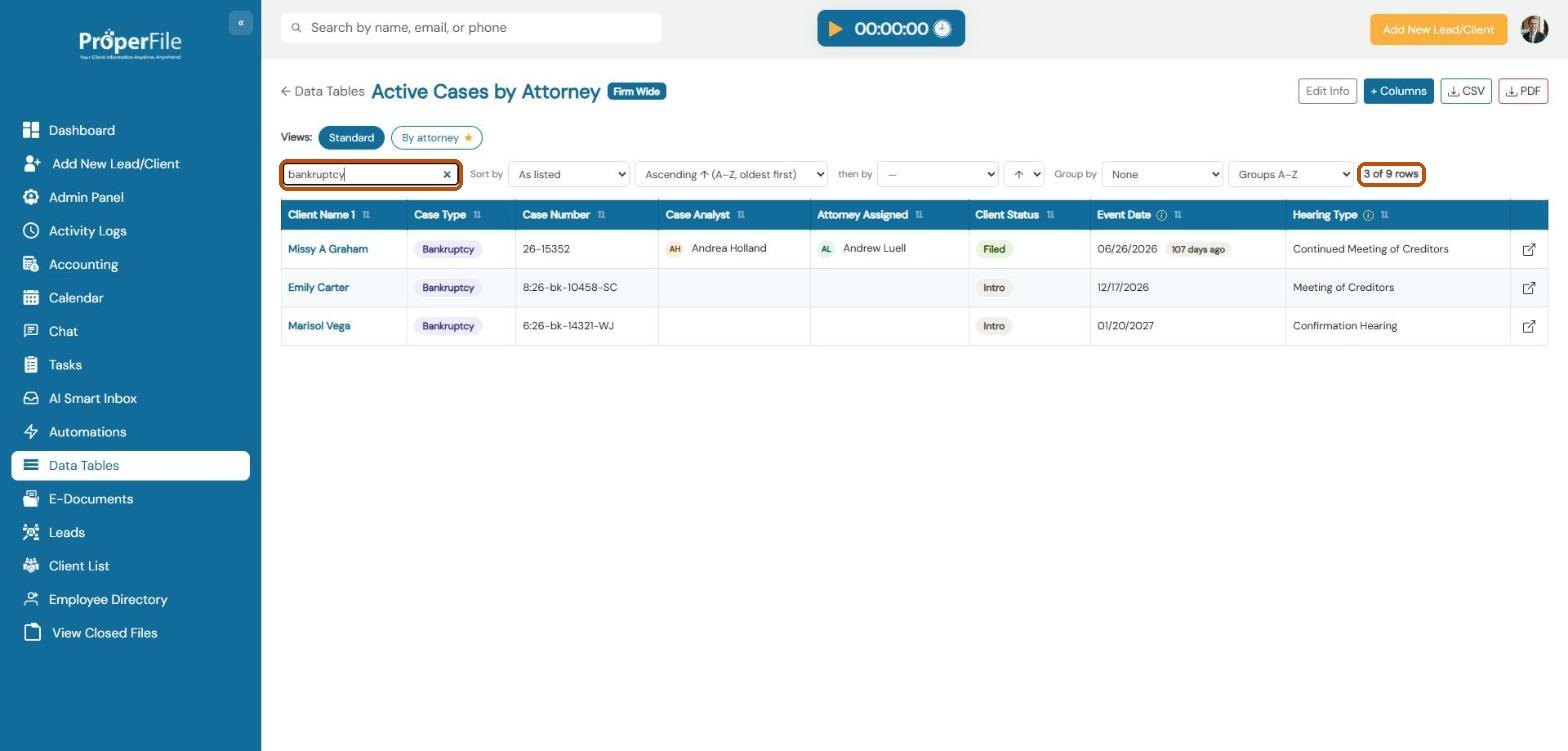
Type in Search this table to show only the rows that contain it, in any column. The count on the right shows how many rows match, for example 3 of 9 rows. Click the × to clear it.
Step 6
Sort it
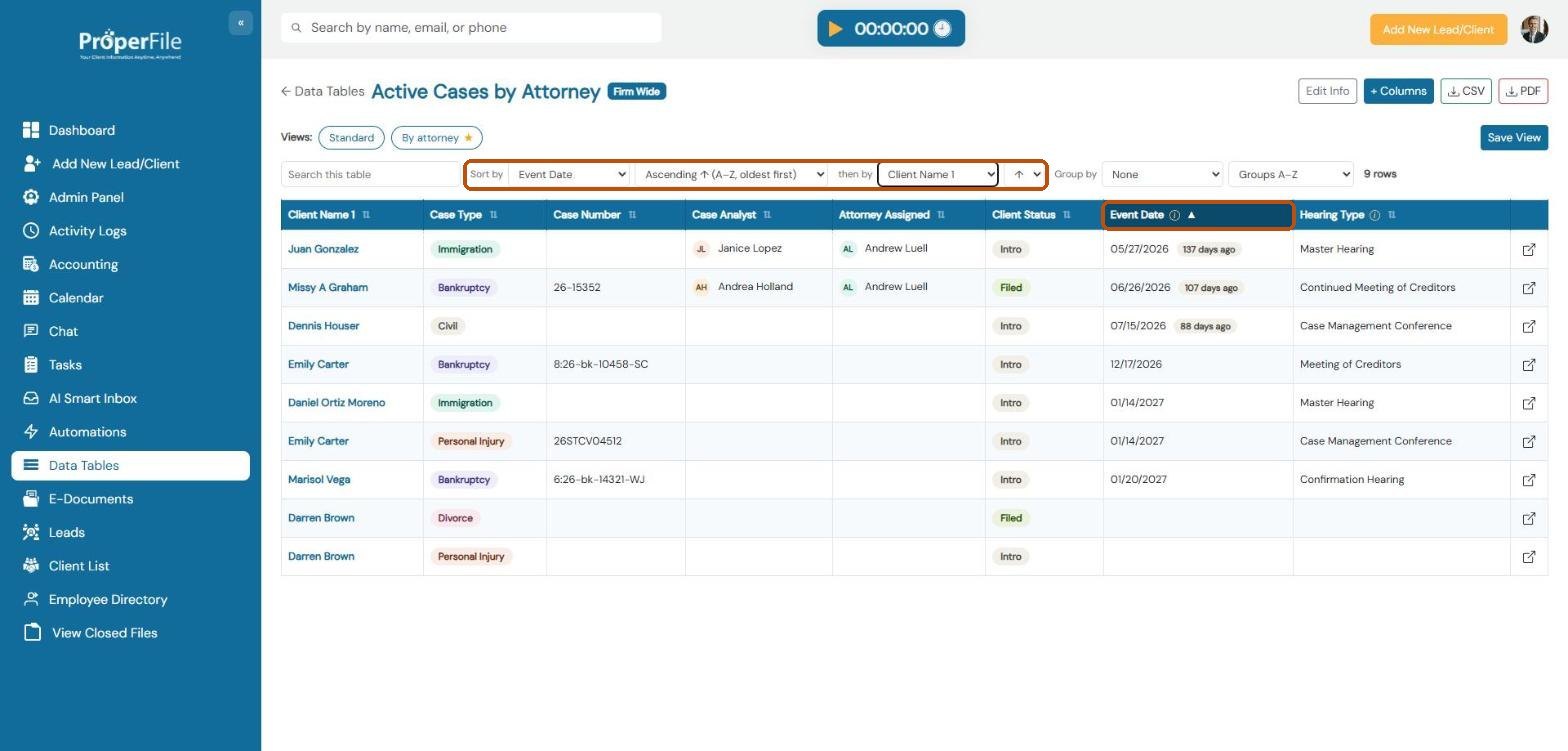
Choose a column in Sort by and the direction, and a second column in then by for rows that tie: for example by court date, then by client name. You can also click a column heading (click again to reverse). Dates sort by date and amounts by value, and empty cells always go last.
Step 7
Group it into separate tables
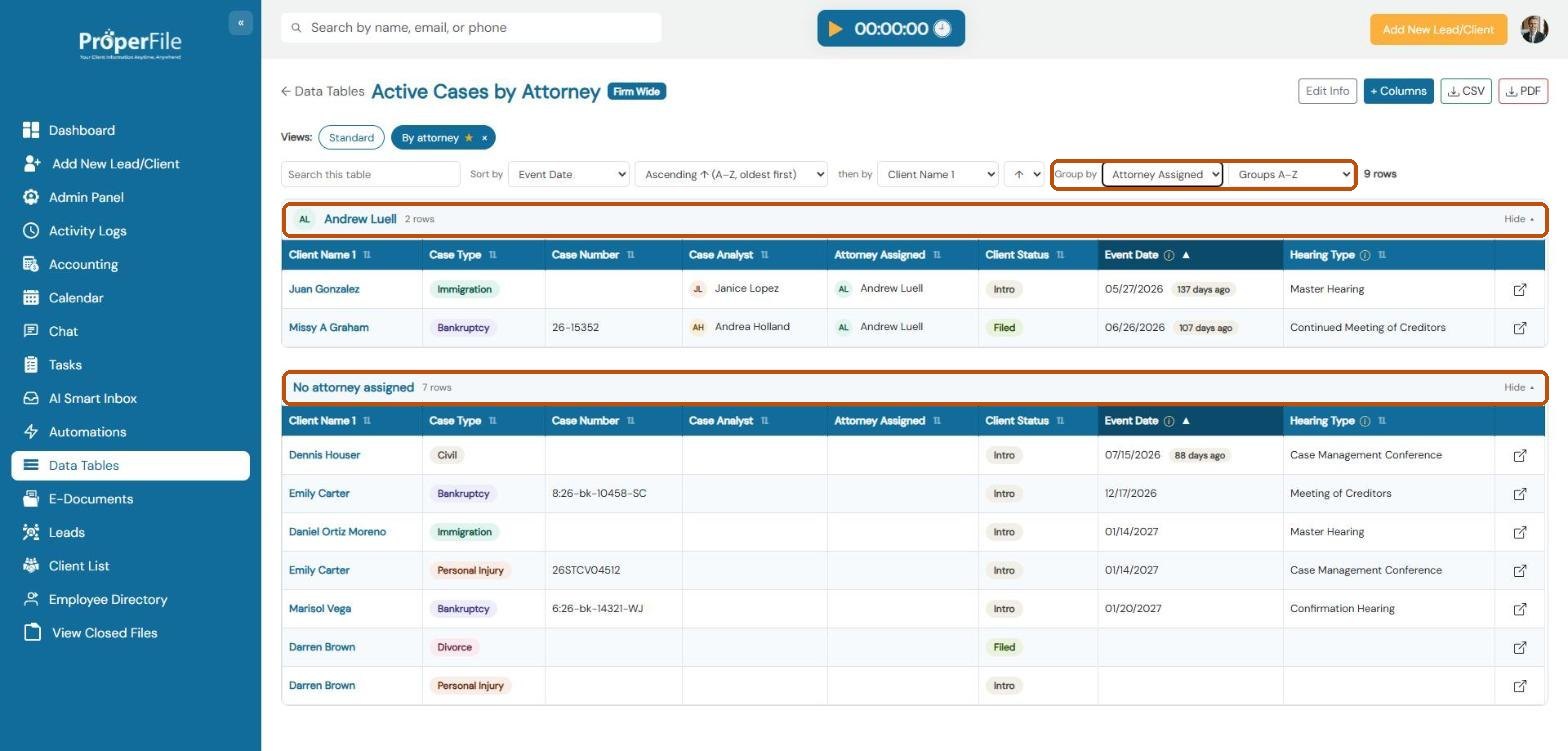
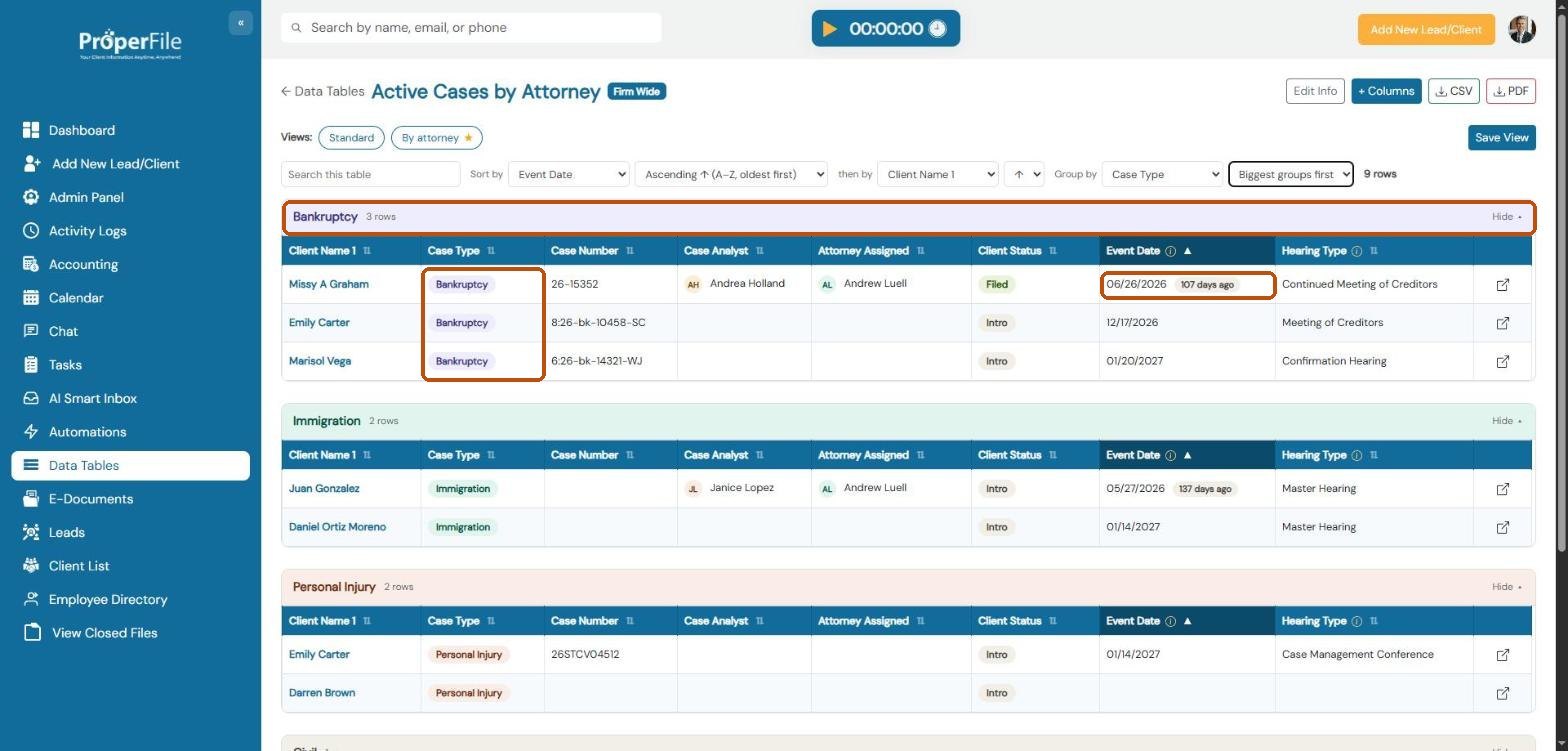
Choose a column in Group by, for example Attorney Assigned, Case Type or Client Status. Each value gets its own table with a gap between them, and the rows without one come last (for example No attorney assigned). Next to it, choose the order of the groups: A–Z, Z–A or Biggest groups first. Click Hide on a group to fold it away.
Step 8
Read the colours
Case type and status show as coloured pills, the same colour in every table: for example Bankruptcy purple, Immigration green; Filed and Discharged green, Dismissed red.
Attorneys and case analysts have a circle with their initials.
Court dates, appointments and Schedules Due by carry a small tag: red when it’s today or within 7 days (in 3 days), amber within 30 days, grey for past events (107 days ago), and red overdue for a schedules due date that has passed.
Step 9
Save it as a view
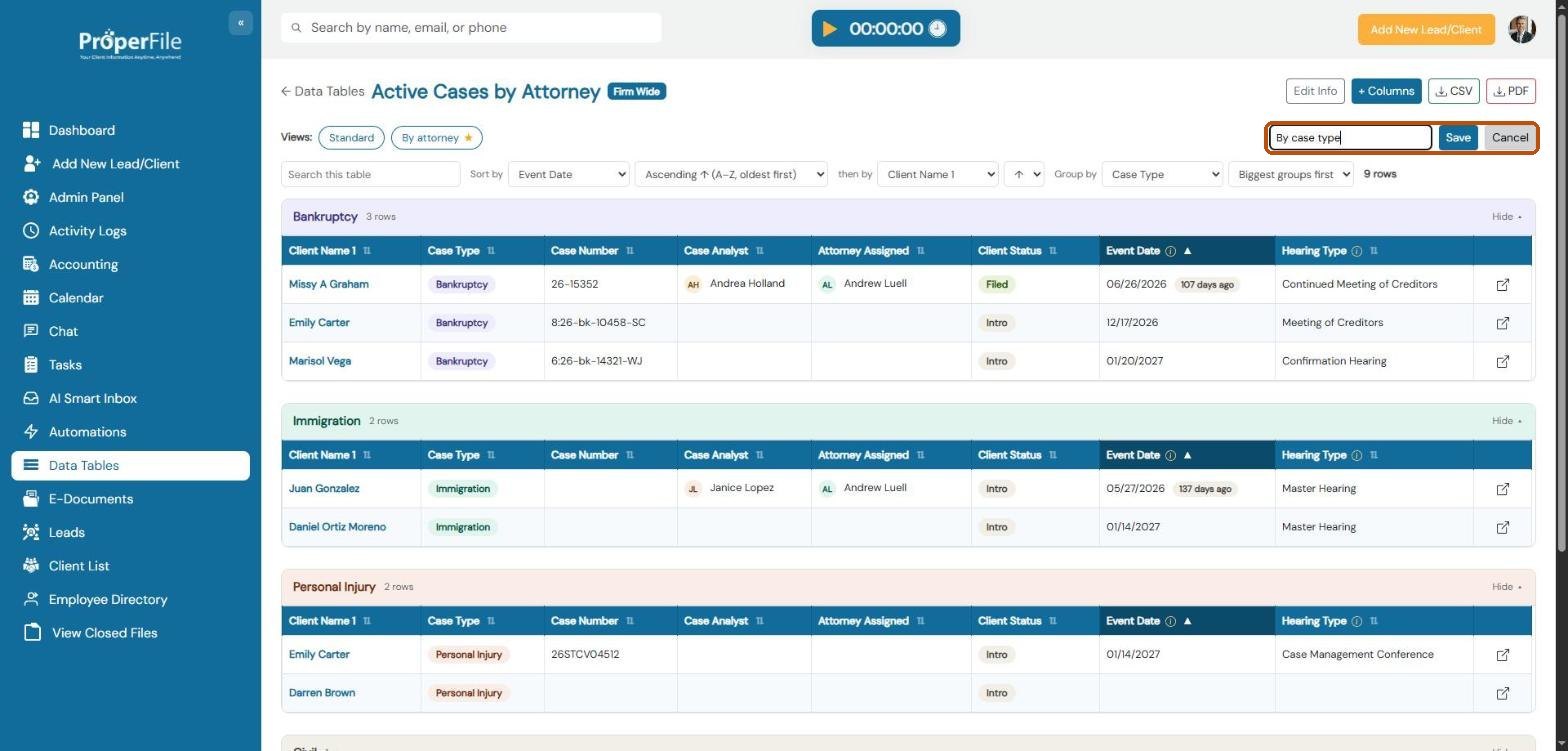
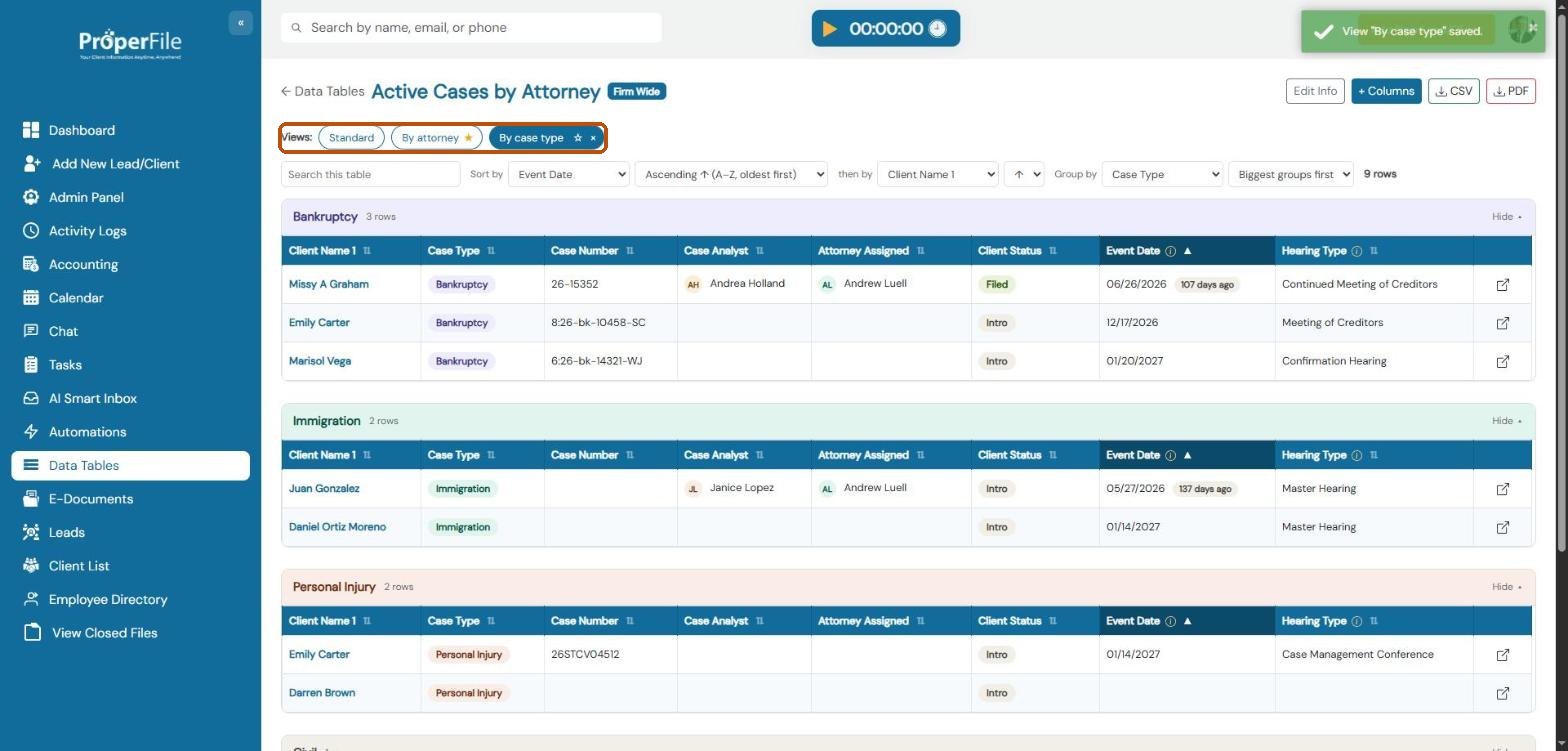
When the sort or grouping on screen isn’t one of the table’s saved views, Save View appears at the top right. Click it, type a name (for example By case type) and click Save. Saving with the name of a view that already exists updates that view.
The view appears as a pill in the Views row above the table. Click a pill to switch the table to it, or Standard for the table as listed and not grouped. The pill you’re looking at is filled in.
The ★ marks the view the table opens in, for everyone. On the view you’re looking at, click ☆ to make the table open in it.
To remove the view you’re looking at, click its ×, then Remove?.
Everyone who can see the table can use its views; saving and removing them is for those who can change the table.
Step 10
Change a value right in the table
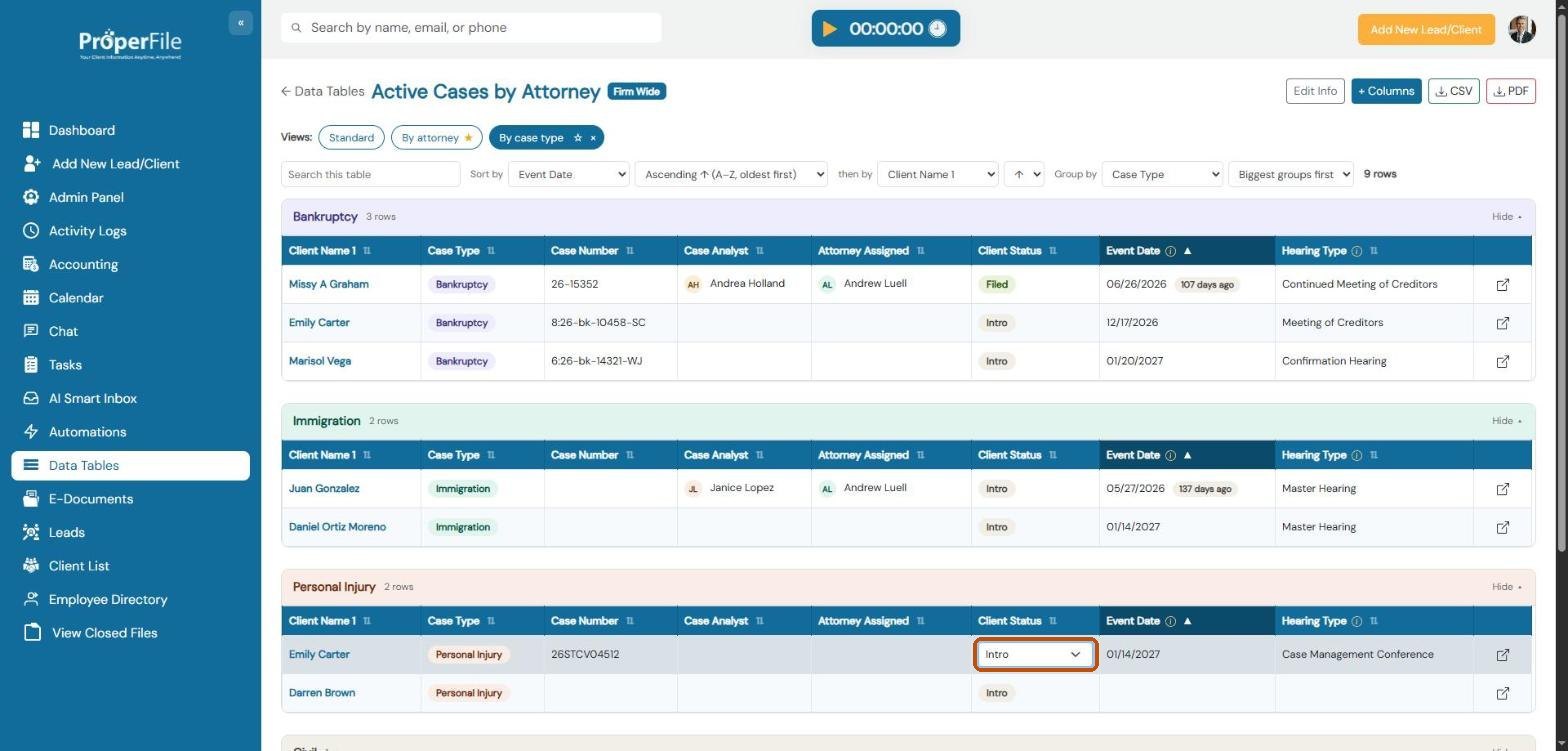
Click a cell to change it, for example a status, case analyst or date. Choose or type the new value and it saves straight away, just as if you’d changed it on the client’s page. Press Esc to cancel. Client names and court dates are changed on the client’s page: click the arrow at the end of a row to open it.
Step 11
Download it
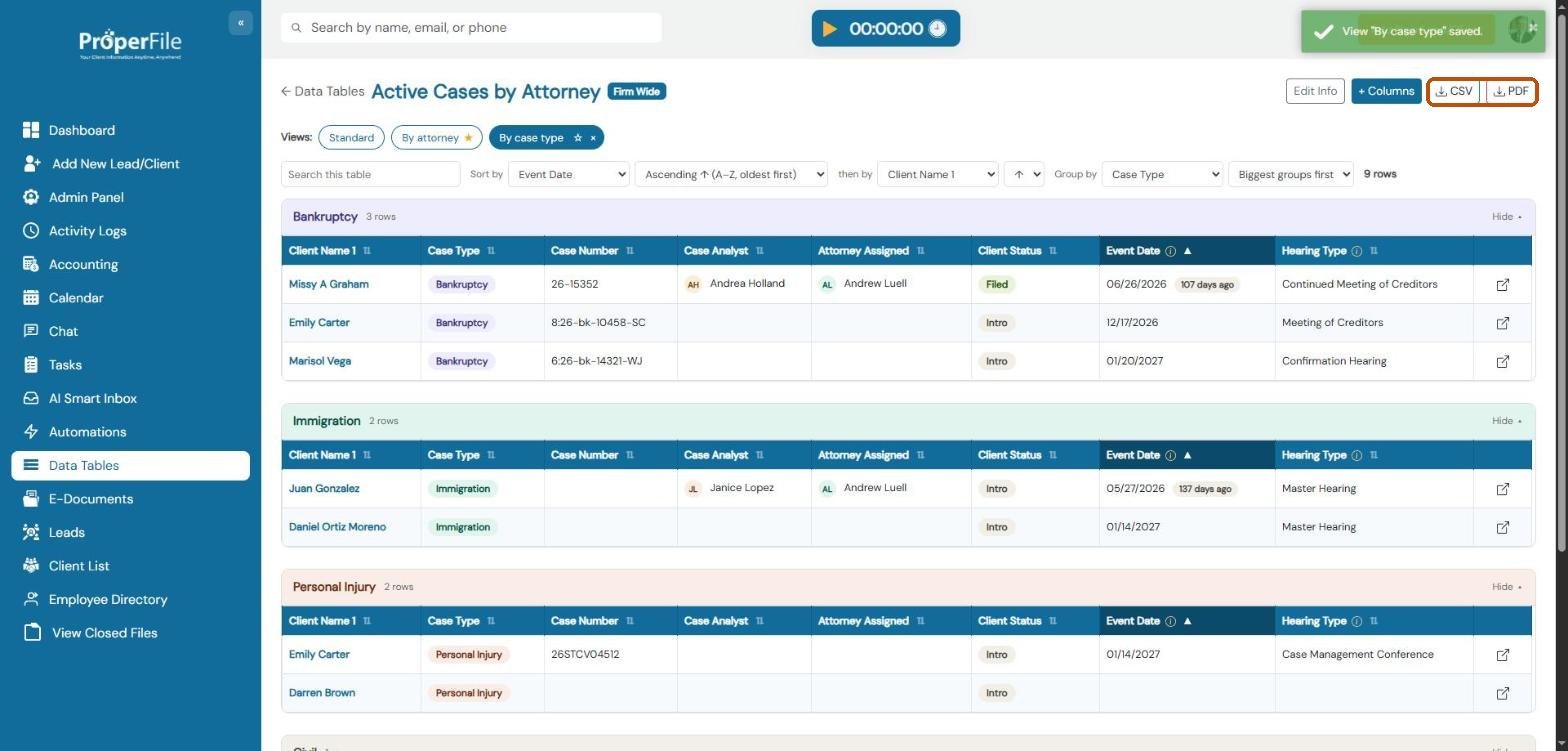
Click CSV (for Excel or Google Sheets) or PDF. The download has the table’s rows sorted and grouped as you see them on screen.
What’s next
Keep going
To change a table’s name or who sees it, click Edit Info; to change its columns or filters, click + Columns. For firm-wide numbers and charts, see Reports. All guides are in the Help Center.