The AI Smart Inbox reads court notices, orders and letters, whether you upload them or forward them by email. It works out which client each one is for, and suggests court dates, tasks for the deadlines in it, and more. Nothing is saved, filed or emailed until you approve it.
Time needed: about 6 minutes.
Before you start: your firm’s owner or an administrator turns on AI Smart Inbox in Admin Panel > AI Credits, and it then shows in your left menu. Each document the AI reads uses 1 AI credit, and your firm gets 50 included every month: see AI credits. Your firm’s owner and administrators can use it. Other staff need Use AI ticked in User Management.
Step 1
Open the AI Smart Inbox and upload documents
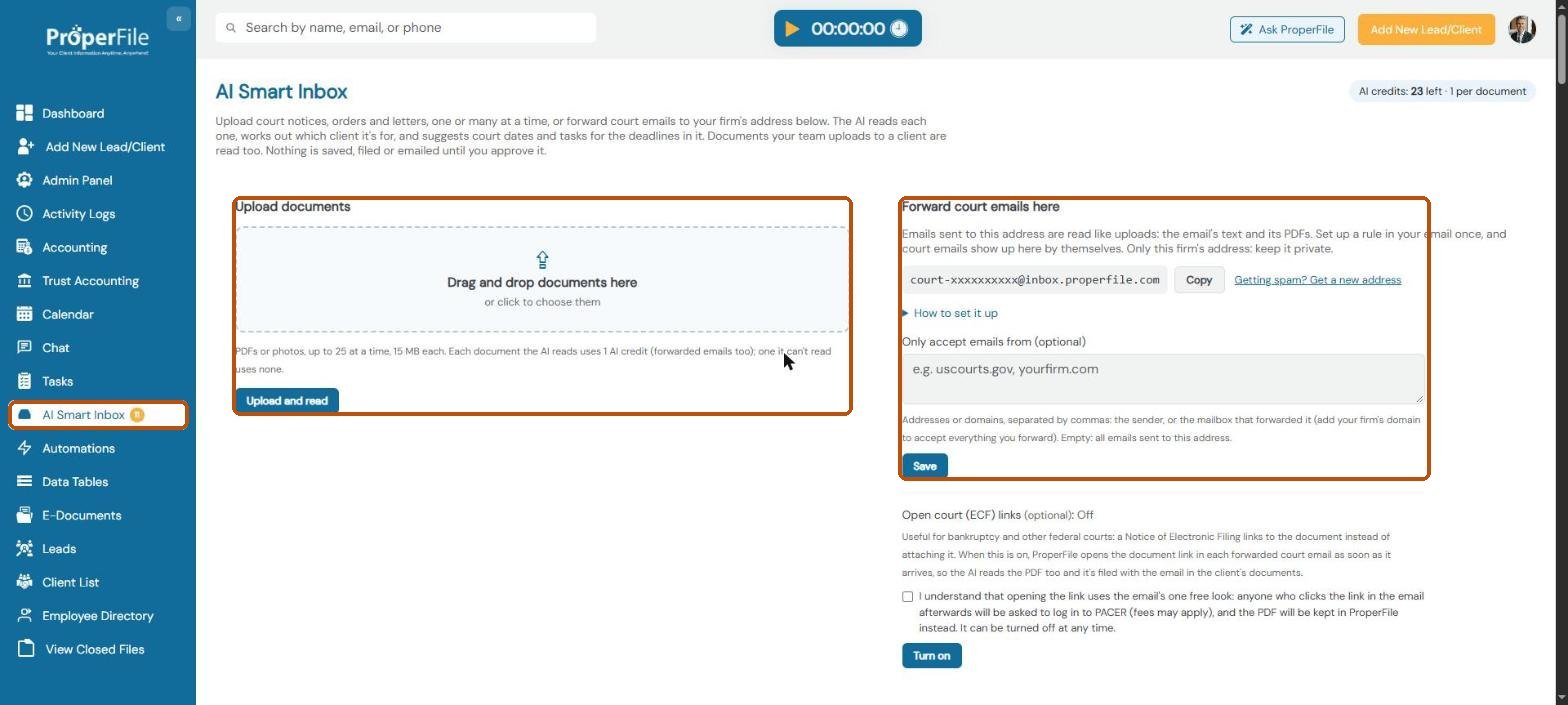
Click AI Smart Inbox in the left menu. The number next to it shows how many documents are waiting for you. Drag up to 25 PDFs or photos into the Drag and drop documents here box, or click it to choose them, then click Upload and read. The AI reads each one in about a minute. Each document it reads uses 1 AI credit; the top right shows how many your firm has left.
Documents your team uploads to a client’s Documents tab are read too, so you don’t have to upload them twice.
Step 2
Review what the AI found
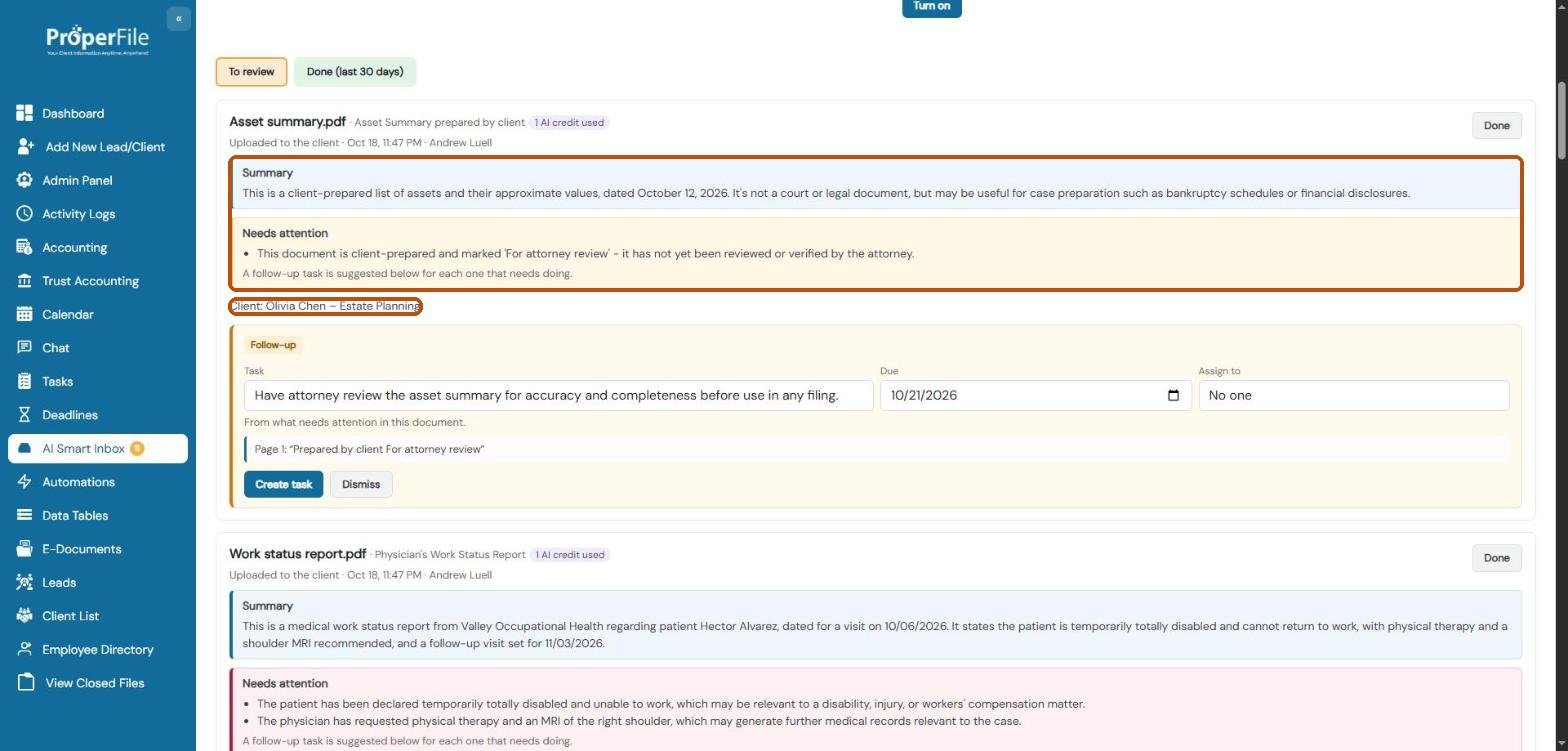
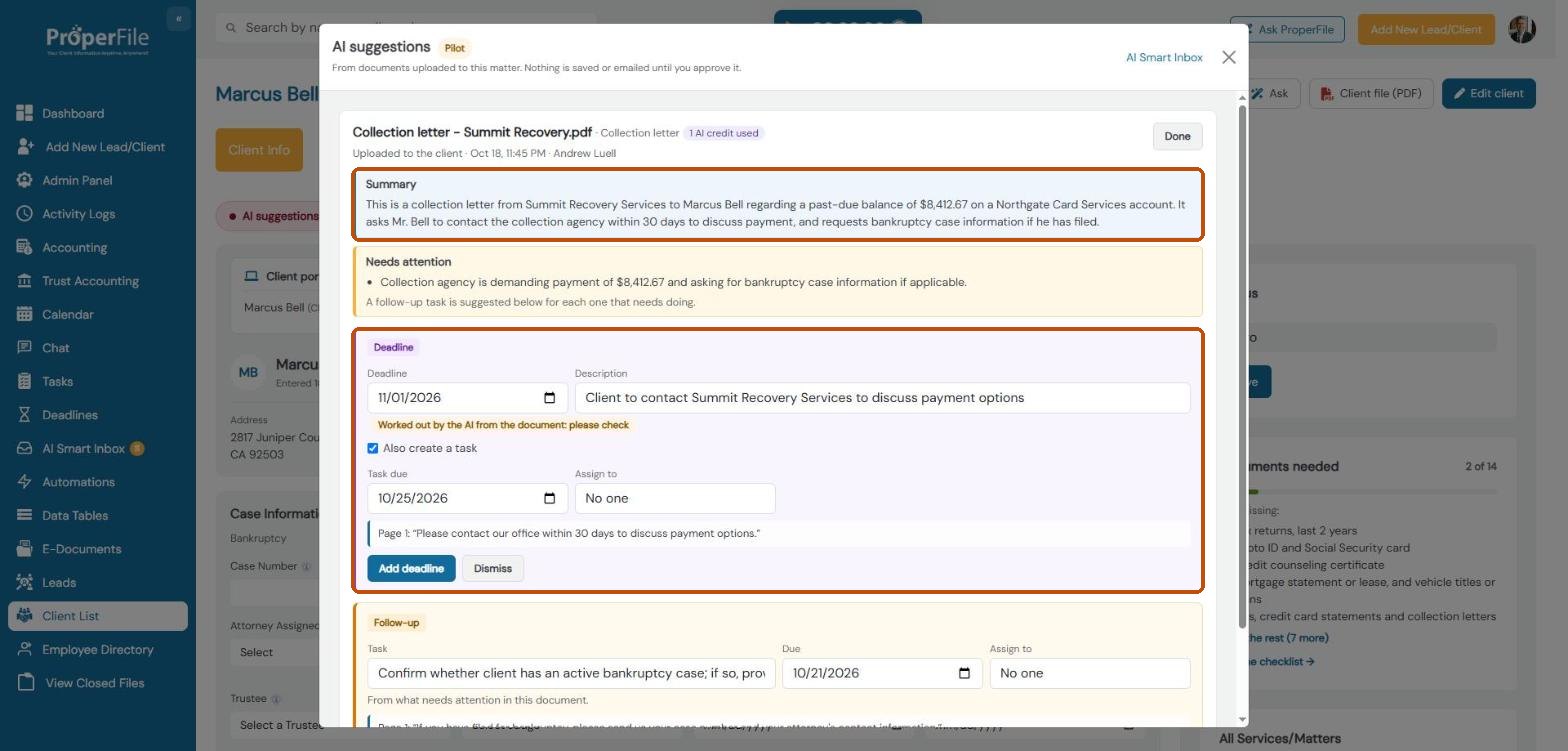
Each document gets a card with a short summary, a Needs attention box for anything you mustn’t miss (red when the case is at risk), and the client it’s for. The AI matches the client by the case number or A-number on your matters first, then by name.
Tip: a client matched by name says Matched by name: please check. Make sure it’s the right person before you approve anything.
Step 3
Confirm the client
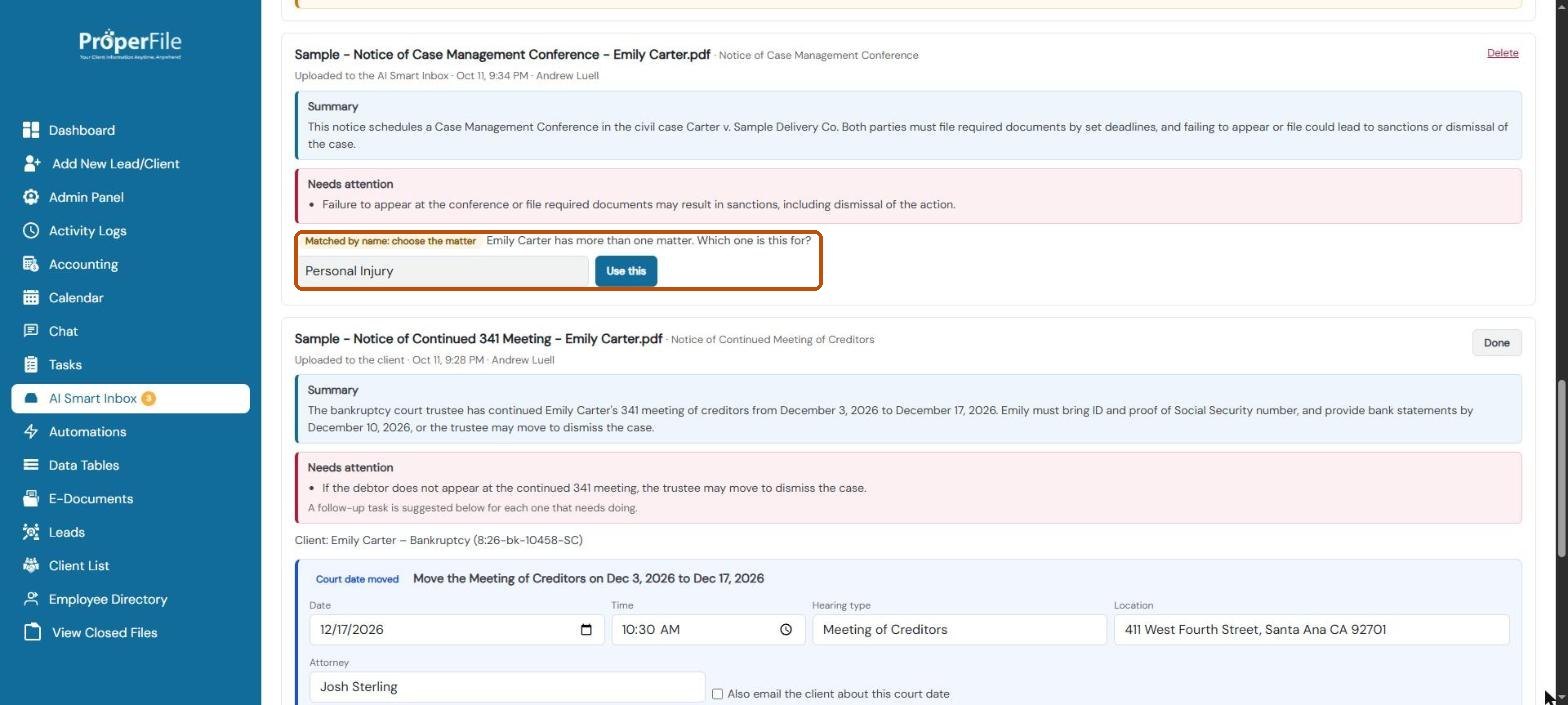
If the client has more than one matter, choose the right one and click Use this. If the AI isn’t sure, it lists Possible matches to pick from; you can also search by name or case number. As soon as you choose, the document goes into that client’s Documents tab.
Watch it: choosing the client, then the suggestions appear
Step 4
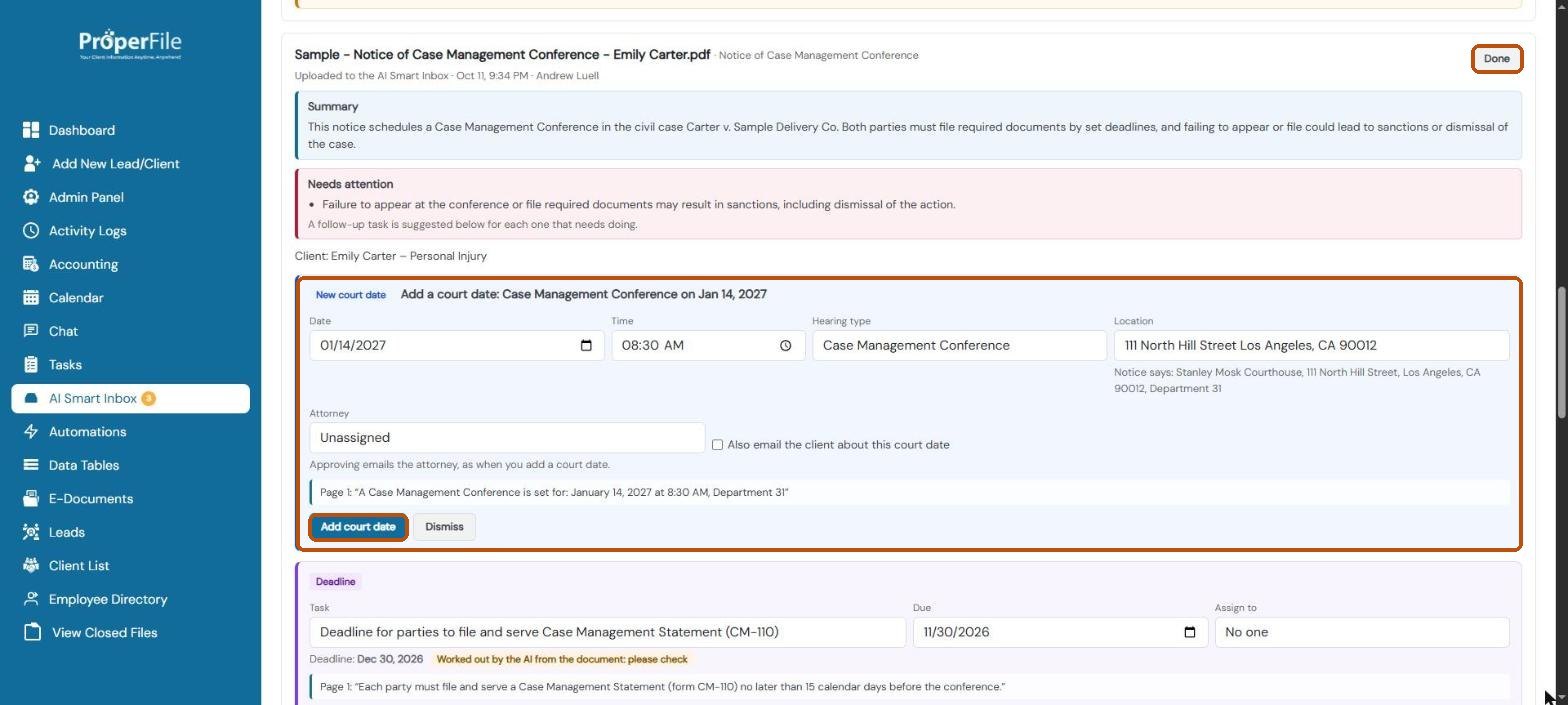
Approve court dates
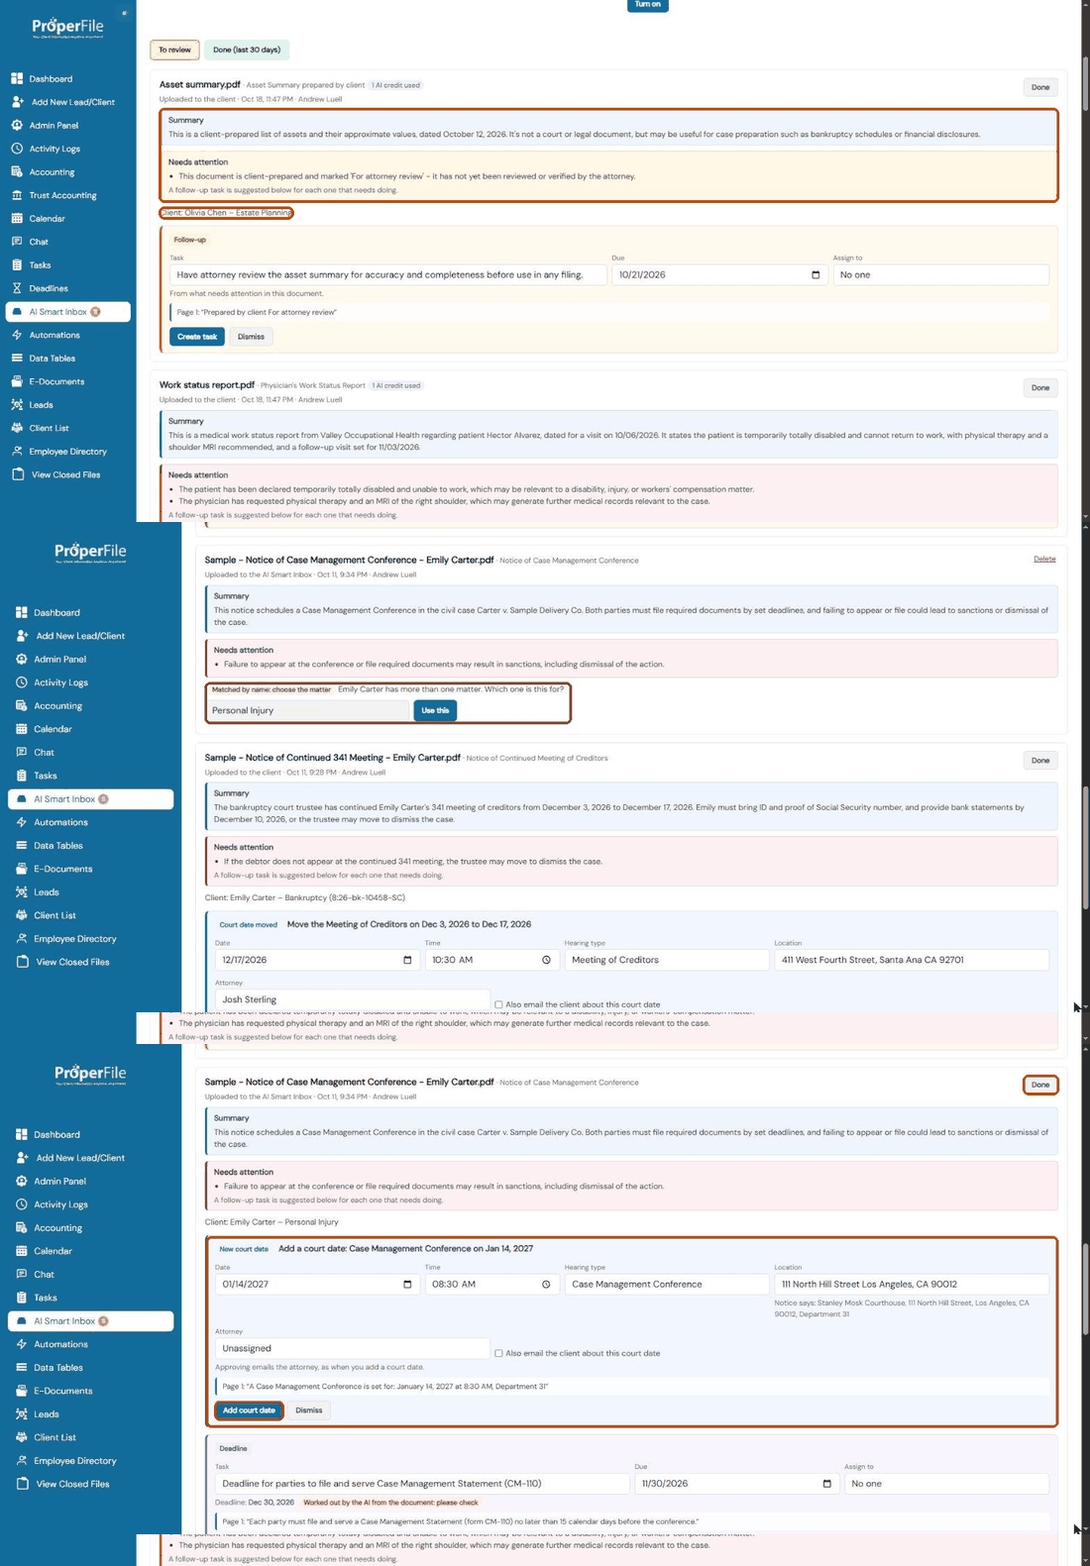
Each hearing in the document becomes a New court date with the date, time, hearing type, location and attorney filled in. Check them, change anything you need, and click Add court date. It’s saved exactly as if you had added it yourself, and the attorney gets the usual court-date email. Tick Also email the client only if you want the client told too.
A notice that moves or cancels a hearing shows as Court date moved or cancelled, and updates the court date already on the calendar. If the court isn’t in your list, click + Add this court to your locations.
Step 5
Add deadlines
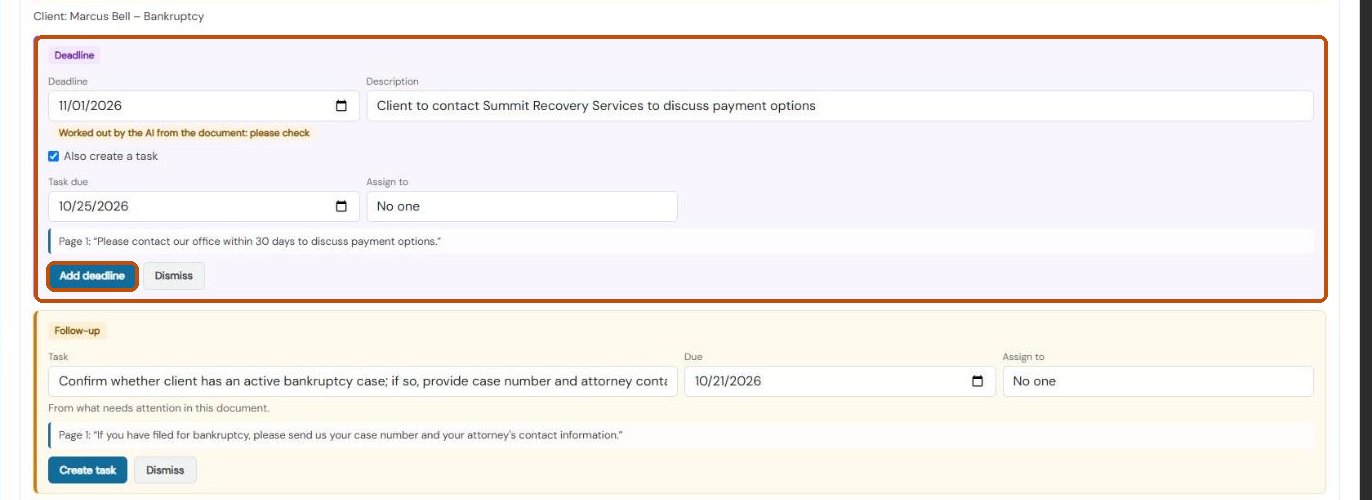
Each deadline in the document becomes a suggested Deadline, in a purple card, with its date and what must be done. Check them and click Add deadline: it’s added to the matter’s Deadlines on the Client Info tab (see Case deadlines), linked to the document it came from.
Leave Also create a task ticked to add a task that’s due before the deadline (30 days before when it’s 60 or more days away, 14 days before when it’s 30 to 59 days away, and 7 days before when it’s closer), and choose who to assign it to. A deadline that’s already too close is marked Urgent.
Tip: a date marked Worked out by the AI from the document: please check was calculated from wording like “within 70 days of this notice”. Check it before you create the task.
Step 6
Case numbers, follow-ups and finishing
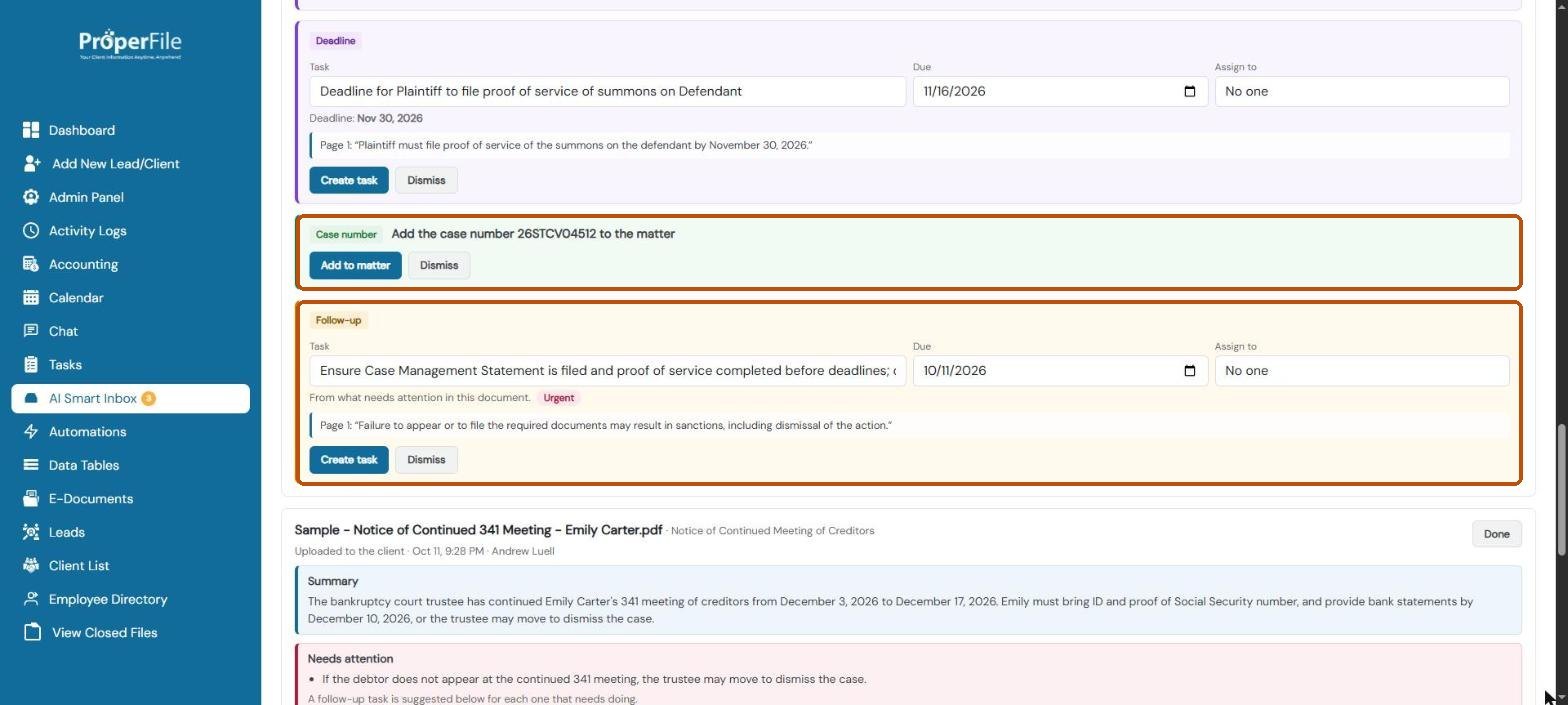
If the matter doesn’t have the case number or A-number yet, click Add to matter, and future notices will match it automatically. Anything in Needs attention that needs doing comes with a Follow-up task. Click Dismiss on anything you don’t need.
When you’re finished with a document, click Done. Use the red Delete link only for a document that isn’t any client’s; it can’t be recovered.
Step 7
Add a new client from a document
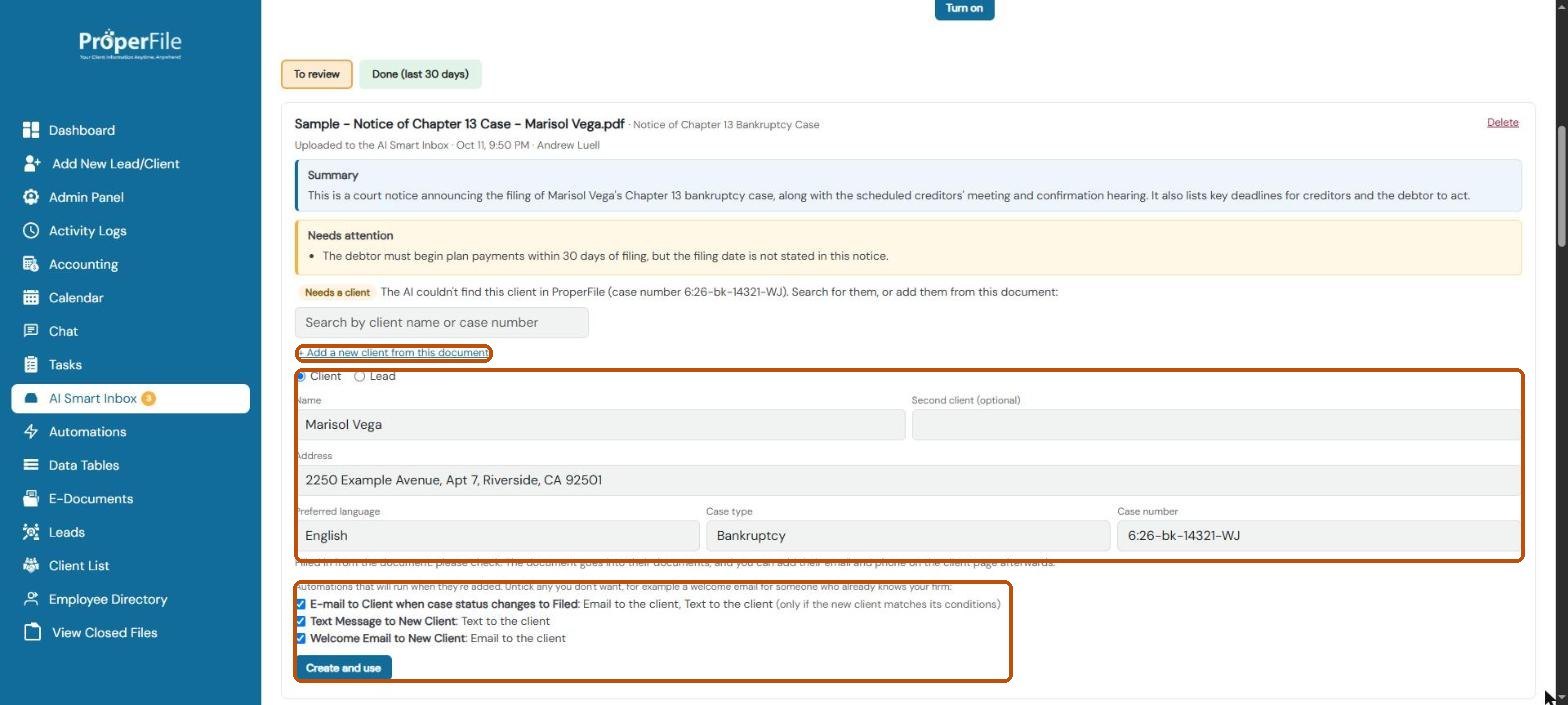
If the client isn’t in ProperFile yet, click + Add a new client from this document. Choose Client or Lead and check what the AI filled in: the name, the address (the city is filled in from it), the preferred language, the case type, and the case number or A-number. The list at the bottom shows your automations that will run; untick any you don’t want, for example a welcome email for someone who already knows your firm. Click Create and use.
Step 8
Forward court emails automatically
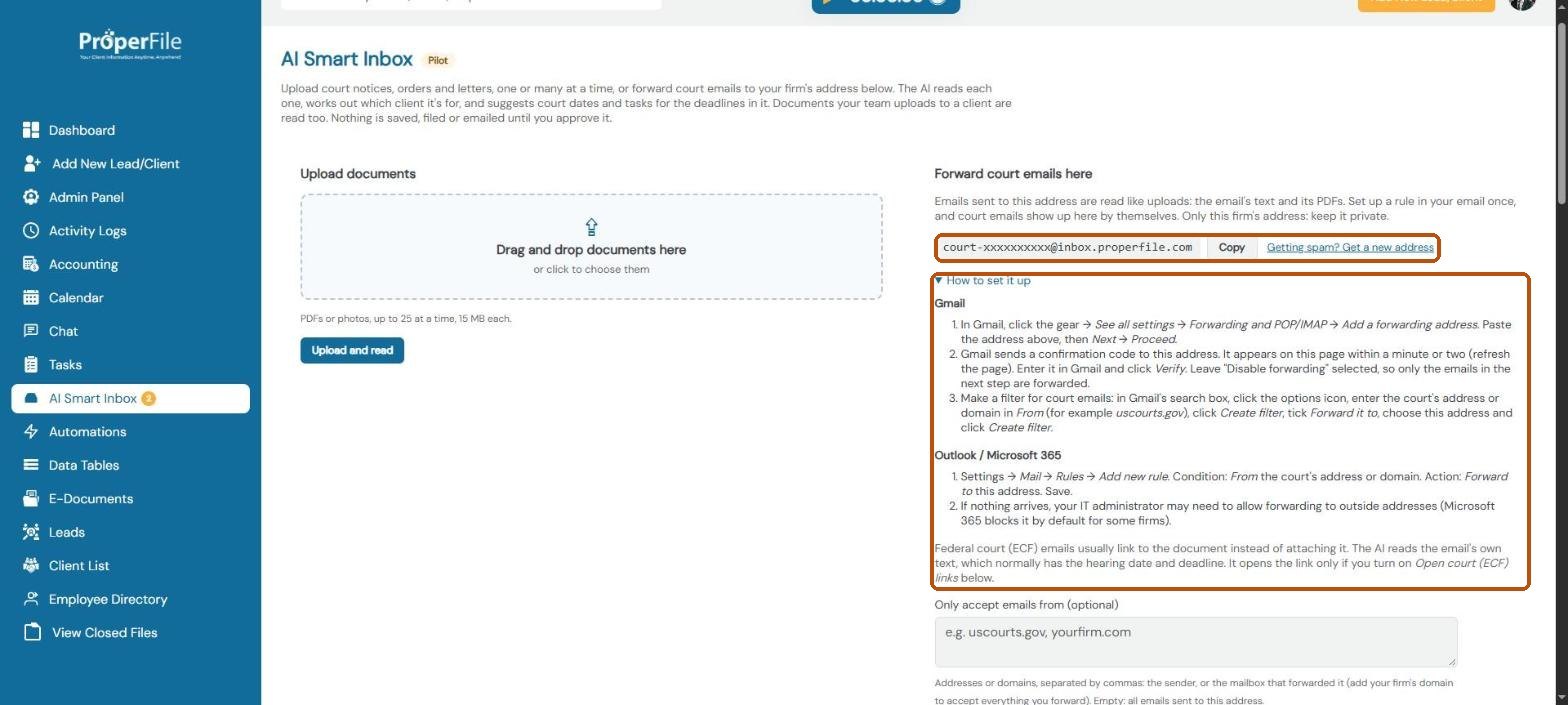
Your firm has its own private address under Forward court emails here. Click Copy, then open How to set it up for the Gmail and Outlook steps. Once a rule forwards your court emails there, they show up in the AI Smart Inbox by themselves, with their PDFs. Gmail’s confirmation code appears on this page so you can finish setting up.
Under Only accept emails from you can list addresses or domains (for example uscourts.gov). If the address ever gets spam, click Getting spam? Get a new address.
Step 9
Get the PDF from court (ECF) emails (optional)
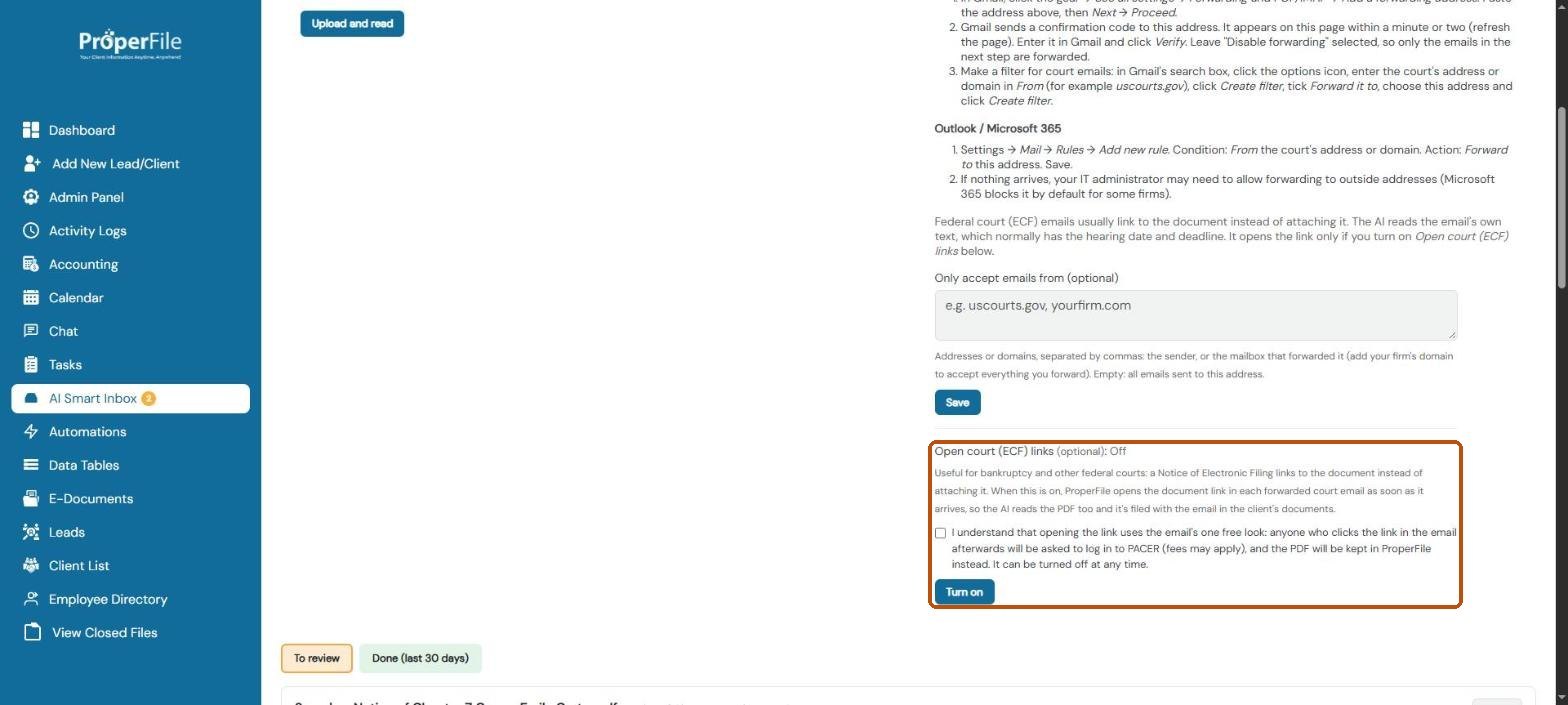
Bankruptcy and other federal court emails (a Notice of Electronic Filing) link to the document instead of attaching it. The AI always reads the email’s own text, which normally has the hearing date and deadline. To get the PDF too, your firm’s owner or an administrator can turn on Open court (ECF) links, under the forwarding address: tick the box and click Turn on.
ProperFile then opens the document link in each forwarded court email as soon as it arrives. The AI reads the PDF, and it’s filed with the email in the client’s Documents tab (for example ECF document 12.pdf). If the court doesn’t give the PDF, the card says why. You can click Turn off at any time.
Tip: opening the link uses the email’s one free look. Anyone who clicks the link in the email afterwards is asked to log in to PACER (fees may apply), so open the PDF in ProperFile instead.
Step 10
See it on the client’s page
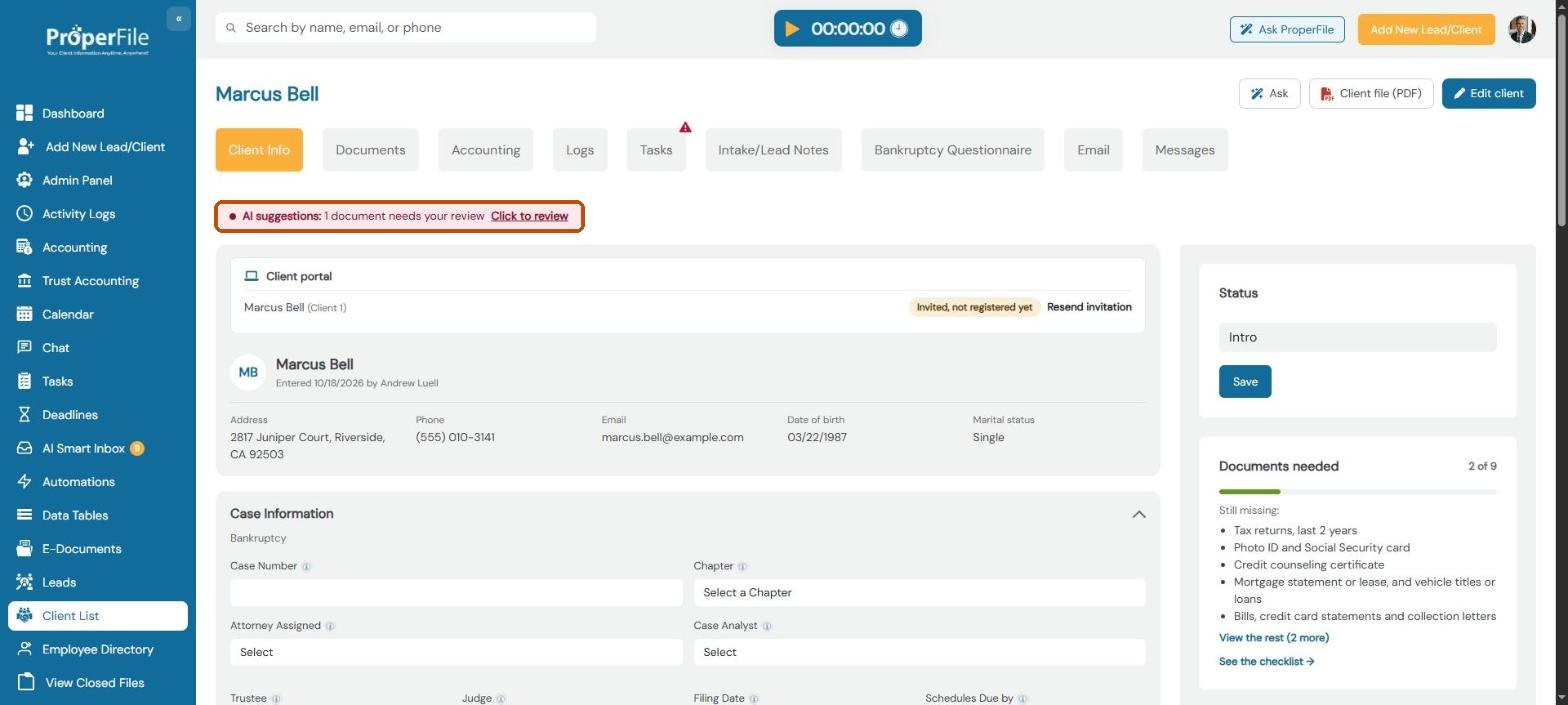
Anything waiting for a client also shows as a red AI suggestions pill at the top of their page, for example “1 document needs your review”. Click Click to review to open it in a window, where you can approve or dismiss it the same way. The pill goes away when nothing is left.
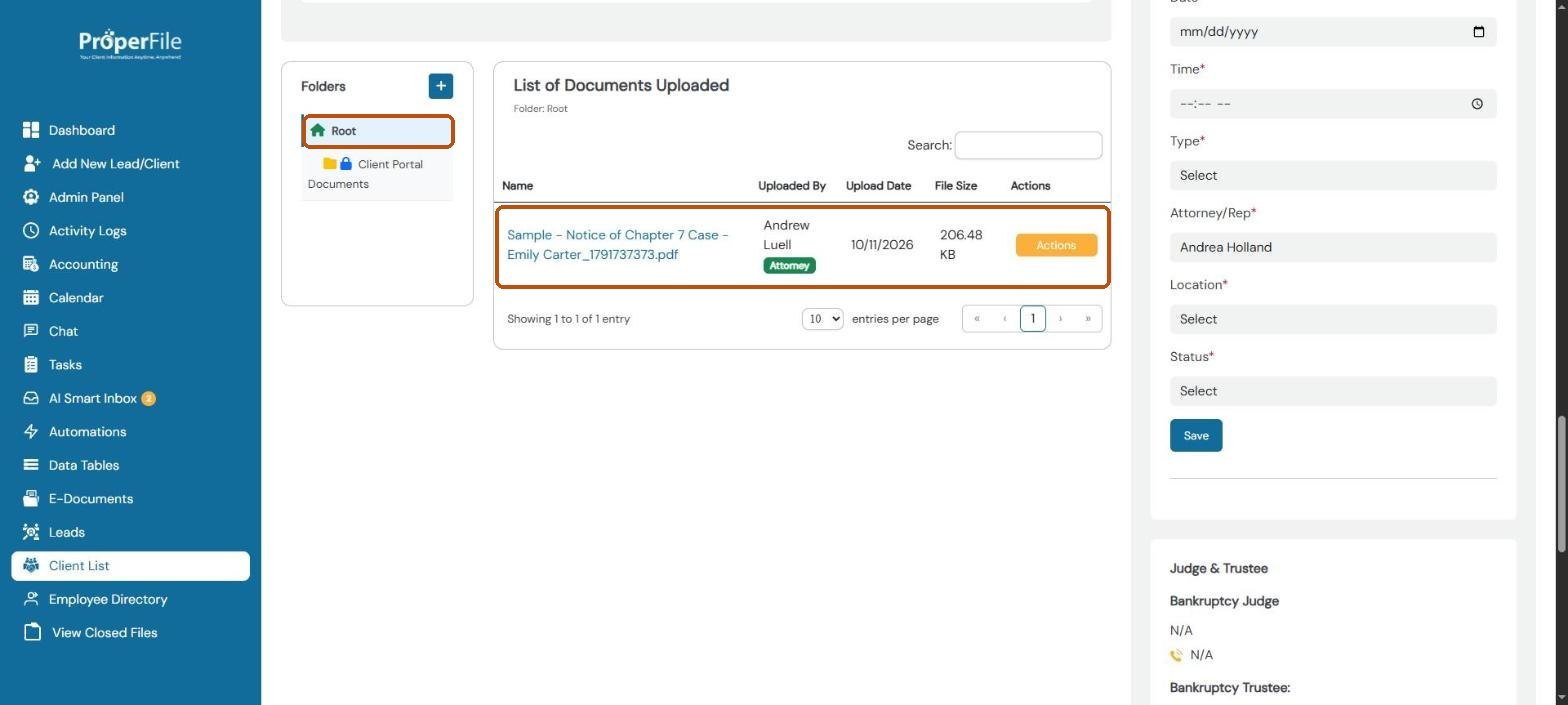
The document itself is in their Documents tab, in the Root folder, and the summary is saved in their Logs tab.
What’s next
Keep going
The AI’s suggestions are a safety net, not a replacement for your own docketing: always check them against the document. Next, see your court dates in Calendar and hearings and your tasks in Tasks. All guides are in the Help Center.